Only supported Meraki MX models are allowed to be added used with Cisco dCloud. See more about Meraki in How Routers Work with Cisco dCloud and Get a Meraki MX Router for dCloud Use.
Configure Your Router for dCloud Use
dCloud Router & Endpoint Help content is under construction.
Coming soon in February 2026

Meraki MX appliances are required for dCloud content.
Important: The Cisco dCloud Team does not provide support for configuring or troubleshooting unsupported legacy routers
Configure Router for dCloud – dCloud Router Configuration Tool
This configuration method requires Java 1.6 or later installed on your laptop. If you have problems with this configuration method, see Troubleshoot dCloud Router Configuration Tool Issues.
- Add your router to dCloud and then download the customized dCloud configuration files and the configuration tool. [Show Me How]
- Prepare your router for dCloud configuration. [Show Me How]
- If your router is connected to the Internet modem, unplug the Ethernet cable from the router and wait one minute for the router to adjust to the disconnection.
- On your laptop, open the folder where you saved the downloaded EndpointWizard.zip file and then extract the content of the zip file.
- To start the dCloud Router Configuration Tool, open the extracted content folder and then double-click the EndPointRouterWizard.jar file:

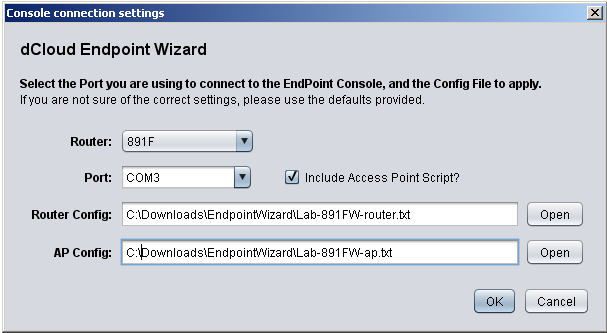
- In the Console connection settings window, click each drop-down and choose its corresponding value:
- Router: Select the router model you want to configure.
- Port: Select the serial/COM port on your laptop that connects to your router with the console cable. [Show Me How]
- Include Access Point Script: Mark this checkbox if your router (such as the 1941W and 1861W) includes an access point (AP).
- Router Config and AP Config: Make sure the pathnames match the full paths to the customized dCloud router (*router.txt) and access point (*ap.txt) configuration files on your laptop. The files are in the extracted content folder. AP Config is grayed out if the router does not include an access point.

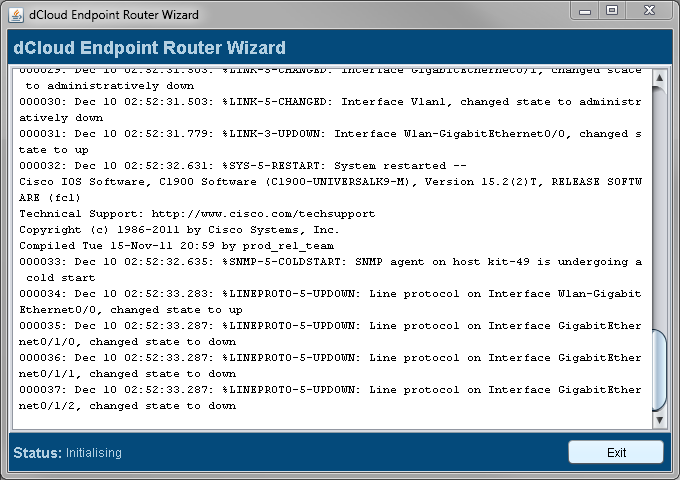
- Click OK. The dCloud Endpoint Router Wizard window opens and displays progress messages as the tool applies dCloud configuration settings. The Status bar at the bottom of the window displays the current status. Do not type anything in the window - just wait for it to finish scrolling.
If you do not see the progress window, refer to Troubleshoot dCloud Router Configuration Tool Issues for help.

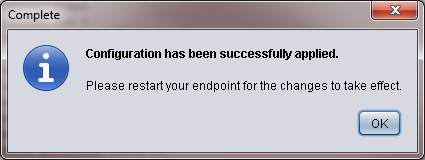
- After the configuration tool finishes applying the dCloud configuration, a Complete popup window appears.

Click OK and then Exit to end the configuration tool.
- Power off your router and leave it off for at least five minutes.
- Connect your router to your Internet modem with the Ethernet cable.
- Power on your router to make the new dCloud configuration settings take effect.
- Do any post-configuration work required for your router model. [Show Me How]
- Test your connections to the Internet and dCloud. [Show Me How]
Configure Router for dCloud - Internet Method
You can copy the router and access point (AP) configuration files for dCloud through a web browser directly to your router.
- Add your router to dCloud. [Show Me How]
You do not need to download customized dCloud configuration files. Instead, you copy them directly to the router console from a dCloud data center.
- Prepare your router for dCloud configuration. [Show Me How]
- From your laptop, connect to your router command line interface (CLI) using a terminal emulator program. [Show Me How]
- If prompted for a username and password, enter the factory-default credentials which are usually cisco/cisco.
- On your router, enter the following commands to open privileged EXEC mode, and then copy the dCloud router configuration over the Internet to the router:
router> enable [Starts privileged mode; prompt changes from router> to router#]
When you enter the URL part of the copy command, replace the variables dCloudDataCenter and KitID as follows:
router# copy http://dCloudDataCenter/dCloud/config/KitID/router startup-config [Copies dCloud configuration to router]– dCloudDataCenter: Enter the URL of the dCloud data center where you added the router: Americas data center: dcloud-rtp-web-1.cisco.com APJ data center: dcloud-sng-web-1.cisco.com EMEAR data center: dcloud-lon-web-1.cisco.com GC data center: dcloud-chi-web-1.cisco.com
– KitID: Enter the Kit ID number assigned to your router in dCloud. To find the Kit ID number, log into the dCloud data center where you added the router, click Dashboard > Devices > Routers, and then in your list of routers find the router and its Kit ID. - If your router has an external or built-in access point you want to use with dCloud, connect to the wireless AP console, copy the dCloud AP configuration to the router, and then end the AP console connection:
>router# service-module wlan-ap 0 session [Connect to wireless AP console; prompt changes to ap#]
ap# copy http://dCloudDataCenter/dCloud/config/KitID/ap startup-config [Copies dCloud AP configuration to router]
ap# end [Ends connection to AP console, returns to router privileged mode; prompt changes from ap# to router#] - Save the dCloud configuration changes and then log off from your router connection using the following commands:
>router# copy running-config startup-config [Saves copied changes in default router startup file]
router# exit [Logs off from router connection] - Power off your router and any connected APs for at least five minutes.
- Power on your router and connected APs to make the new dCloud configuration settings take effect.
- Do any post-configuration work required for your router model. [Show Me How]
- Test your connections to the Internet and dCloud. [Show Me How]
Configure Router for dCloud - Console Method
You can copy and paste router and access point (AP) configurations for dCloud from your laptop to the router.
- Add your router to dCloud and then download the customized dCloud configuration files to your laptop. [Show Me How]
- Prepare your router for dCloud configuration. [Show Me How]
- From your laptop, connect to your router command line interface (CLI) using a terminal emulator program. [Show Me How]
- If prompted for a username and password, enter the factory-default credentials which are usually cisco/cisco.
- On the router, change to privileged EXEC mode:
router> enable [Starts privileged mode; prompt changes from router> to router#]
router# - On your laptop, open the folder where you saved the downloaded EndpointWizard.zip file and then extract the content.
- In the extracted content folder, find the router configuration file (ends with router.txt), open the file in a text editor, and then copy/paste up to 25 lines of the file at a time to the router console to apply the dCloud router configuration.
- If you connected an external access point to your router for use with dCloud, reset the wireless AP configuration to the factory defaults using the following commands:
router# service-module wlan-ap 0 session [Connects to wireless AP console; prompt changes to ap#]
ap# service-module wlan-ap 0 reset default-config [Reset wireless AP configuration to factory defaults] - To apply the dCloud configuration to the wireless AP, find the downloaded AP configuration file on your laptop (ends with ap.txt), open the file in a text editor, and then copy/paste up to 25 lines of the file at a time to the AP console to apply the wireless AP dCloud configuration.
ap# <<copy/paste AP config file here in sections up to 25 lines each>> [Applies wireless AP dCloud configuration]
- Exit the wireless AP console, save the dCloud configuration changes, and then log off from your router connection using the following commands:
ap# end [Ends AP console connection; prompt changes from ap# to router#]
router# copy running-config startup-config [Saves changes in default router startup file]
router# exit [Logs off from router connection] - Power off your router and any connected APs for at least five minutes.
- Power on your router and connected APs to make the new dCloud configuration settings take effect.
- Do any post-configuration work required for your router model. [Show Me How]
- Test your connections to the Internet and dCloud. [Show Me How]
Configure Router for dCloud - Console+TFTP Method
This configuration method requires access to a TFTP server and credentials to log in to the server. You can use your laptop as a TFTP server by setting up a TFTP program such as tftpd32 or tftpd64 for Windows or TftpServer for Mac on the laptop.
You can copy router and access point (AP) configurations for dCloud to a TFTP server and install the configurations from the TFTP server.
- Add your router to dCloud and then download the customized dCloud configuration files to your laptop. [Show Me How]
- Prepare your router for dCloud configuration. [Show Me How]
- Copy the customized dCloud configuration files from your laptop to a TFTP server.
- From your laptop, connect to your router command line interface (CLI) using a terminal emulator program. [Show Me How]
- If prompted for a username and password, enter the factory-default credentials which are usually cisco/cisco.
- On your router, enter the following commands to open privileged EXEC mode and then copy the dCloud router configuration from the TFTP server to the router:
router> enable [Starts privileged mode; prompt changes from router> to router#]
router# copy tftp://TFTP-SERVER-IP-ADDRESS/ROUTER-CONFIG-FILE-router.txt startup-config [Copies router configuration to router] - If your router includes an external or built-in access point that you want to use with dCloud, connect to the AP console, reset the wireless AP configuration on the router to factory defaults, copy the dCloud AP configuration file from the TFTP server, and then exit the wireless AP console:
router# service-module wlan-ap 0 session [Connect to wireless AP console; prompt changes to ap#]
ap# service-module wlan-ap 0 reset default-config [Resets wireless AP configuration to factory defaults]
ap# copy tftp://TFTP-SERVER-IP-ADDRESS/AP-CONFIG-FILE-ap.txt startup-config [Copies AP configuration to router]
ap# end[Ends AP EXEC mode; prompt changes from ap# to router#] - Save the dCloud configuration changes and then log off from your router connection using the following commands:
router# copy running-config startup-config [Saves changes in default router startup file]
router# exit [Logs off from router connection] - Power off your router and any connected APs for at least five minutes.
- Power on your router and connected APs to make the new dCloud configuration settings take effect.
- Do any post-configuration work required for your router model. [Show Me How]
- Test your connections to the Internet and dCloud. [Show Me How]
For additional Meraki information, explore Meraki LearningLabs, Documentation, and more.