Last updated: January 2025

Overview
Access to most active sessions in Cisco dCloud requires a VPN connection between your laptop and the dCloud data center that is hosting your active session. Use one of the three options below to connect your laptop to an active dCloud session using the Cisco Secure Client - AnyConnect VPN:
- Use AnyConnect VPN Already Installed on Your Laptop
- Download and Install Cisco Secure Client from Cisco.com to Use AnyConnect VPN
- Use the dCloud Browser-based AnyConnect VPN
All options are described below in order of recommended use.
Due to differences in operating systems and AnyConnect VPN versions, your screens may differ slightly from those included in the steps below.
Use Cisco Secure Client - AnyConnect VPN Already Installed on Your Laptop
If you are logged in to AnyConnect VPN, please log off before starting this procedure.
To use Cisco Secure Client - AnyConnect VPN already installed on your laptop:
- In dCloud, go to My Hub > Sessions, find the active session, and click View.
- Depending on your demo version, click Info (or Details).
- Open the AnyConnect Credentials section (or click Session Details and scroll to the AnyConnect Credentials section).
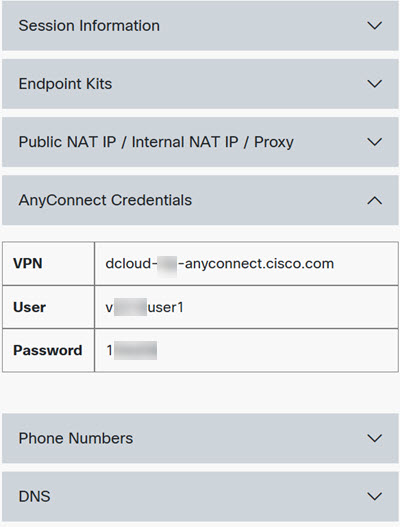
- If not already open on your laptop, search for Cisco Secure Client on your laptop.
- Copy the VPN (or Host URL) from your session's AnyConnect Credentials. Paste it in the AnyConnect VPN box in the AnyConnect login window. Click Connect.
If you get a connection error, remove the “https://” part of the URL and try the connection again.
- Copy the User ID and the Password from your session's AnyConnect Credentials and paste each into the AnyConnect VPN login window.
- Click OK.
- Click Accept on the window confirming your connection.
- When connected to your AnyConnect VPN session, the Cisco Secure Client icon is displayed in your system tray (Windows) or task bar (Mac).
- To view connection details or to disconnect, click the Cisco Secure Client icon and choose Disconnect.
Download and Install Cisco AnyConnect Client from Cisco.com
If you encounter any issues with this method, please use the method described in the Use the dCloud Browser-based AnyConnect VPN.
To download and install the Cisco Secure Client from Cisco.com (so you can access AnyConnect VPN):
- Go to the Cisco Support & Downloads page.
- You must be logged in with your Cisco.com credentials.
- You may be prompted to accept or comply with additional terms in order to download the software. Follow the directions in the popup window.
- In the Downloads box, enter anyconnect.
- In the search results, choose the version of AnyConnect you want to install. Cisco dCloud recommends installing the latest version of Cisco Secure Client (including AnyConnect).
- Locate the package you need based on your operating system.
- For Windows users, we recommend choosing Full installation package - Window / Standalone installer (ISO).
- For Mac users, we recommend choosing Full installation package - Mac OS X / Standalone installer (DMG).
- Click Download.
- You might be required to accept or comply with additional terms in order to download the software; follow the directions in the popup windows.
- Review the Cisco End User License Agreement and then click Accept License Agreement.
- Install the Cisco Secure Client software on your laptop.
- In dCloud, go to My Hub > Sessions. Find the active session. Click View.
- Depending on your demo version, click Info (or Details).
- Open the AnyConnect Credentials section (or click Session Details and scroll to the AnyConnect Credentials section).

- If not already open on your laptop, search for Cisco Secure Client on your laptop.
- Copy the VPN (or Host URL) from your session's AnyConnect Credentials. Paste it in the AnyConnect VPN box in the Cisco Secure Client login window. Click Connect.
If you get a connection error, remove the “https://” part of the URL and try the connection again.
- Copy the User ID and the Password from your session's AnyConnect Credentials and paste each into the AnyConnect VPN login window.
- Click OK.
- Click Accept on the window confirming your connection.
- When connected to your AnyConnect VPN session, the Cisco Secure Client icon is displayed in your system tray (Windows) or task bar (Mac).
- To view connection details or to disconnect, click the Cisco Secure Client icon and choose Disconnect.
Use the dCloud Browser-based AnyConnect VPN
Due to the Java applet used by this method, you might encounter compatibility issues with your local browser and/or installed version of Java. Use this option only if you cannot install the Cisco Secure Client - AnyConnect VPN on your laptop.
To use the dCloud browser-based AnyConnect VPN:
- In dCloud, go to My Hub > Sessions. Find your active session.
- Click Info. Scroll down to the AnyConnect Credentials section. Click the question mark.
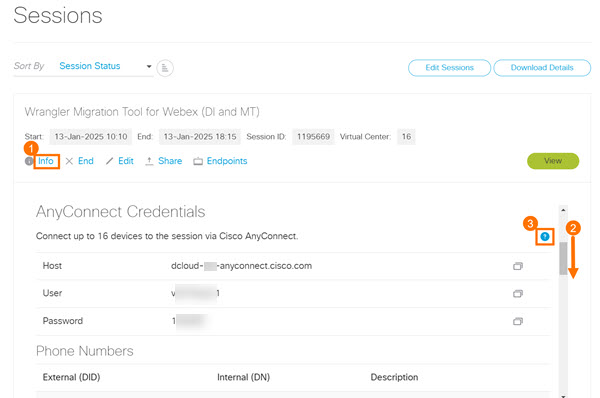
- Find the section Use the dCloud Browser Based Cisco AnyConnect.
- Click the link next to Click the Host URL to start this option. You are brought to the AnyConnect VPN server address for the dCloud data center hosting your session. For example, the AnyConnect server address for the Americas data center is https://dcloud-rtp-anyconnect.cisco.com.
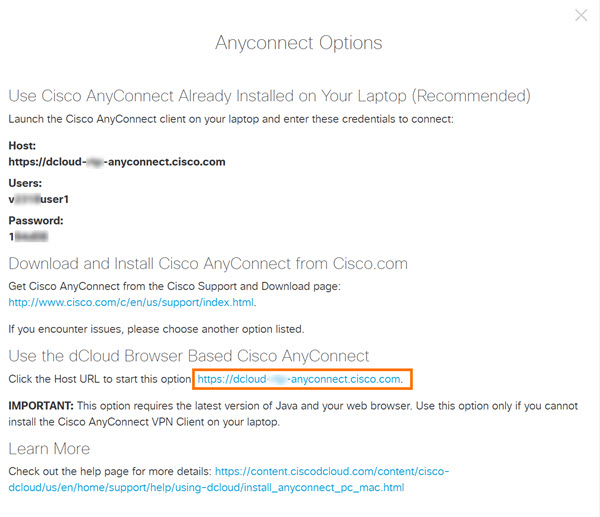
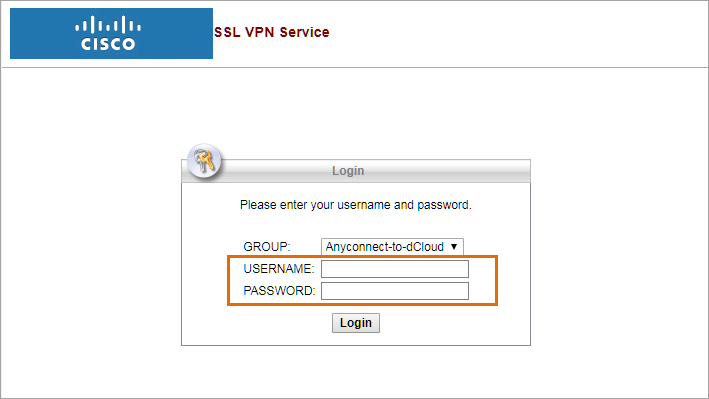
- Accept any security alerts or certificate warnings. The SSL VPN Service window opens in a new browser tab (or new window).
- Copy the User ID and the Password from the AnyConnect Credentials section and paste each into the SSL VPN Service Login window.
- Click Login.
If the automatic installation does not start, close and re-open your browser window.
- Follow the on-screen instructions to connect to AnyConnect VPN.
- Accept any security alerts or certification warnings.
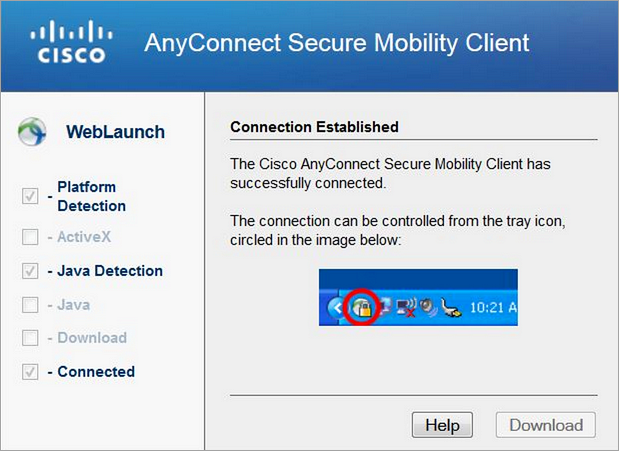
- When you have successfully connected to AnyConnect, a window displays, similar to below, advising of a successful connection. Also, the Cisco Secure Client icon is displayed in the system tray (Windows) or task bar (Mac).
If the automatic installation fails, install AnyConnect VPN client manually by following the on-screen instructions.
- To view connection details or to disconnect, click the Cisco Secure Client icon and choose Disconnect.